I recently needed to create a Web Service (WS) application fast, and since I know nothing about web services, I thought that the best way would be to try out some sample WS apps first. I found that most of the online sample WS app were introduced using Visual Studio .NET.
Since I have a newer Visual Studio 2005 Professional Edition, I thought that there will be no problem for me to follow the online exercises. Boy was I wrong!!!
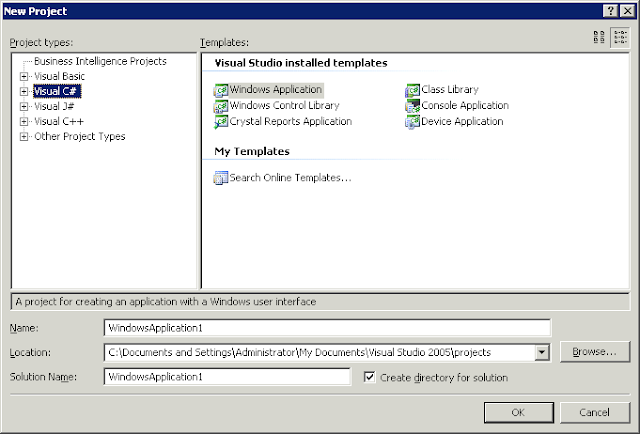
The first problem I encountered was just to create a Visual C# Web Service project. According to the instructions: from Visual Studio, select File -> New -> Project.... Then select the ASP.NET Web Service template...
Wait a minute!!! There's no ASP.NET Web Service template!!!
The only one I found was by selecting File -> New -> Web Site....
After a lot of googling and countless failed attempts to load the ASP.NET Web Service template, I found out that all I had to do was to install the Service Pack 1 for Visual Studio.
Unbelievable right?
Saturday, October 31, 2009
Publishing Web Service in IIS 6 from Visual Studio 2005
I was recently tasked with creating a simple Web Service (WS) application to serve as a training tool, and the problems that I encountered can be considered cruel and unusual for any pentester. The most idiotic issue came from using Visual Studio 2005 to publish the WS in IIS 6. When I used the debugger in Visual Studio (VS) to run the WS app, the app worked fine. But when I tried to publish the WS app in the wwwroot of IIS, the stupid ASP keeps throwing me errors.
I believe that no one should be made to suffer through this again, so I'm going to summarize what I did for *posterity*.
Before I can start, we're going to need a baseline. I was using a default installation of Windows 2003 Server R2 Standard Edition with IIS 6, and a default installation of Visual Studio 2005 Professional Edition without SP1. The baseline WS app will be the default "Hello World" Web Service Web Site from Visual Studio.
1. To create the Web Site in Visual Studio, go to File -> New -> Web Site. Choose ASP.NET Web Service in the dialog box.
You may notice that the Web.config file is missing from VS's Solution Explorer (right windows), but it'll be created when you start debugging.
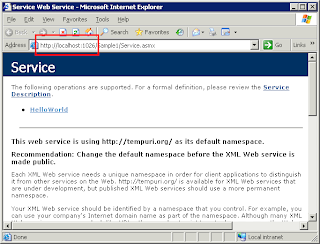
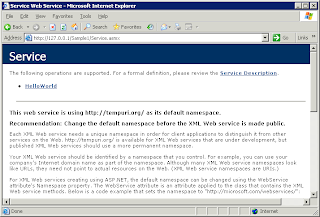
2. Then in VS, select Debug -> Start Debugging. and choose Add a new Web.config file with debugging enabled. in the next dialog box. A new browser is started showing the Web Service directory and you can start playing with the Web Service without any problem.
Notice the port number in the URL, this is not the default IIS 6 web server.
3. Now we will try to publish the WS. In VS, select Build -> Build Web Site. You should get the Build succeeded status. Then select Build -> Publish Web Site. I'm going to publish the WS app in the root directory of IIS: C:\Inetpub\wwwroot\Sample1.
You should get the Publish succeeded status. Here comes the nightmare!!!
4. On the local machine, open the WS's URL in a new browser: http://localhost/Sample1/Service.asmx
You will get the following error:
Parser Error
Description: An error occurred during the parsing of a resource required to service this request. Please review the following specific parse error details and modify your source file appropriately.
Parser Error Message: Could not create type 'Service'.
Source Error:
Line 1: <%@ WebService Language="C#" CodeBehind="~/App_Code/Service.cs" Class="Service" %>
Source File: c:\inetpub\wwwroot\Sample1\Service.asmx Line: 1
Version Information: Microsoft .NET Framework Version:1.1.4322.2300; ASP.NET Version:1.1.4322.2300
5. You need to make 2 changes to solve this error. The first step is to copy the bin directory from your project directory into IIS's web root. Look at your IIS's wwwroot directory structure:
You need to put all your "App_Code" and "bin" directories into the wwwroot directory instead of the published project directory (sub-directory where the asmx file resides). For some unknown reasons, Visual Studio 2005 do not move or copy them from the project directory for you automatically.
Your new IIS wwwroot directory structure should look like this:
You should still get the same error if you reload the browser.
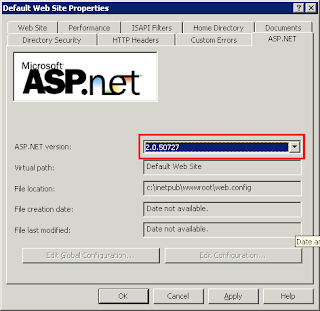
5. The second step is changing the .NET version in IIS 6. IIS 6 is trying to run code compiled in .NET 2 with .NET 1. In Windows, go to Administrative Tools -> Internet Information Services (IIS) Manager. In IIS Manager, expand LOCALSERVER(local computer) -> Web Sites -> Default Web Site.
Right-click Default Web Site and select Properties.In the dialog box, select the ASP.NET tab. Change the ASP.NET version from 1.1.4322 to 2.0.50727 and click OK.
6. Reload the local browser. You should see the following error:
Configuration Error
Description: An error occurred during the processing of a configuration file required to service this request. Please review the specific error details below and modify your configuration file appropriately.
Parser Error Message: It is an error to use a section registered as allowDefinition='MachineToApplication' beyond application level. This error can be caused by a virtual directory not being configured as an application in IIS.
Source Error:
Line 24: ASP.NET to identify an incoming user.
Line 25: -->
Line 26:
Line 27: <!--
Line 28: The section enables configuration
Source File: c:\inetpub\wwwroot\sample1\web.config Line: 26
On a remote browser, you should see the following error when you open the WS's URL (assuming 192.168.1.185 is the WS server's IP): http://192.168.1.185/Sample1/Service.asmx
Server Error in '/' Application.
Details: To enable the details of this specific error message to be viewable on remote machines, please create a <customErrors> tag within a "web.config" configuration file located in the root directory of the current web application. This <customErrors> tag should then have its "mode" attribute set to "Off".
<!-- Web.Config Configuration File -->
<configuration>
<system.web>
<customErrors mode="Off"/>
</system.web>
</configuration>
Notes: The current error page you are seeing can be replaced by a custom error page by modifying the "defaultRedirect" attribute of the application's <customErrors> configuration tag to point to a custom error page URL.
<!-- Web.Config Configuration File -->
<configuration>
<system.web>
<customErrors mode="RemoteOnly" defaultRedirect="mycustompage.htm"/>
</system.web>
</configuration>
7. You need to create an application in IIS 6 with the same name as the virtual directory. From IIS Manager, expand LOCALSERVER(local computer) -> Web Sites -> Default Web Site -> Sample1.
Right-click Sample1 and select Properties.In the dialog box, select the Directory tab. Click on the Create button and click OK.
8. You should find that the WS app is working normally on the local machine.
9. On a remote machine, it looks like the WS is working.
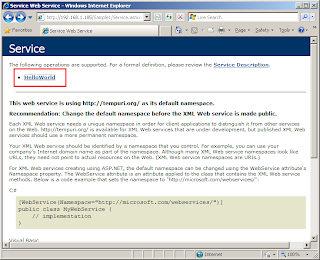
But you will see the following error message when you select the HelloWorld WS:
I believe that no one should be made to suffer through this again, so I'm going to summarize what I did for *posterity*.
Before I can start, we're going to need a baseline. I was using a default installation of Windows 2003 Server R2 Standard Edition with IIS 6, and a default installation of Visual Studio 2005 Professional Edition without SP1. The baseline WS app will be the default "Hello World" Web Service Web Site from Visual Studio.
1. To create the Web Site in Visual Studio, go to File -> New -> Web Site. Choose ASP.NET Web Service in the dialog box.
I'm going to name and save the project as per the following for brevity in this post:
C:\Documents and Settings\Administrator\My Documents\Visual Studio 2005\WebSites\Sample1
You may notice that the Web.config file is missing from VS's Solution Explorer (right windows), but it'll be created when you start debugging.
2. Then in VS, select Debug -> Start Debugging. and choose Add a new Web.config file with debugging enabled. in the next dialog box. A new browser is started showing the Web Service directory and you can start playing with the Web Service without any problem.
3. Now we will try to publish the WS. In VS, select Build -> Build Web Site. You should get the Build succeeded status. Then select Build -> Publish Web Site. I'm going to publish the WS app in the root directory of IIS: C:\Inetpub\wwwroot\Sample1.
You should get the Publish succeeded status. Here comes the nightmare!!!
4. On the local machine, open the WS's URL in a new browser: http://localhost/Sample1/Service.asmx
You will get the following error:
Server Error in '/' Application.
Parser Error
Description: An error occurred during the parsing of a resource required to service this request. Please review the following specific parse error details and modify your source file appropriately.
Parser Error Message: Could not create type 'Service'.
Source Error:
Line 1: <%@ WebService Language="C#" CodeBehind="~/App_Code/Service.cs" Class="Service" %>
Source File: c:\inetpub\wwwroot\Sample1\Service.asmx Line: 1
Version Information: Microsoft .NET Framework Version:1.1.4322.2300; ASP.NET Version:1.1.4322.2300
5. You need to make 2 changes to solve this error. The first step is to copy the bin directory from your project directory into IIS's web root. Look at your IIS's wwwroot directory structure:
C:\
+- Inetpub
+- AdminScripts
+- wwwroot
+- aspnet_client
+- Sample1
+- bin
+- App_Code.compiled
+- App_Code.dll
+- Inetpub
+- AdminScripts
+- wwwroot
+- aspnet_client
+- Sample1
+- bin
+- App_Code.compiled
+- App_Code.dll
You need to put all your "App_Code" and "bin" directories into the wwwroot directory instead of the published project directory (sub-directory where the asmx file resides). For some unknown reasons, Visual Studio 2005 do not move or copy them from the project directory for you automatically.
Your new IIS wwwroot directory structure should look like this:
C:\
+- Inetpub
+- AdminScripts
+- wwwroot
+- aspnet_client
+- bin
+- App_Code.compiled
+- App_Code.dll
+- Inetpub
+- AdminScripts
+- wwwroot
+- aspnet_client
+- bin
+- App_Code.compiled
+- App_Code.dll
+- Sample1+- App_Code.compiled
+- App_Code.dll
+- bin
+- App_Code.compiled
+- App_Code.dll
You should still get the same error if you reload the browser.
5. The second step is changing the .NET version in IIS 6. IIS 6 is trying to run code compiled in .NET 2 with .NET 1. In Windows, go to Administrative Tools -> Internet Information Services (IIS) Manager. In IIS Manager, expand LOCALSERVER(local computer) -> Web Sites -> Default Web Site.
Right-click Default Web Site and select Properties.In the dialog box, select the ASP.NET tab. Change the ASP.NET version from 1.1.4322 to 2.0.50727 and click OK.
6. Reload the local browser. You should see the following error:
Server Error in '/' Application.
Configuration Error
Description: An error occurred during the processing of a configuration file required to service this request. Please review the specific error details below and modify your configuration file appropriately.
Parser Error Message: It is an error to use a section registered as allowDefinition='MachineToApplication' beyond application level. This error can be caused by a virtual directory not being configured as an application in IIS.
Source Error:
Line 24: ASP.NET to identify an incoming user.
Line 25: -->
Line 26:
Line 27: <!--
Line 28: The
Source File: c:\inetpub\wwwroot\sample1\web.config Line: 26
Version Information: Microsoft .NET Framework Version:2.0.50727.42; ASP.NET Version:2.0.50727.42
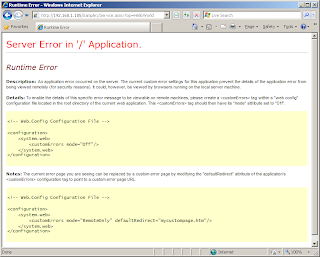
On a remote browser, you should see the following error when you open the WS's URL (assuming 192.168.1.185 is the WS server's IP): http://192.168.1.185/Sample1/Service.asmx
Server Error in '/' Application.
Runtime Error
Description: An application error occurred on the server. The current custom error settings for this application prevent the details of the application error from being viewed remotely (for security reasons). It could, however, be viewed by browsers running on the local server machine.
Description: An application error occurred on the server. The current custom error settings for this application prevent the details of the application error from being viewed remotely (for security reasons). It could, however, be viewed by browsers running on the local server machine.
Details: To enable the details of this specific error message to be viewable on remote machines, please create a <customErrors> tag within a "web.config" configuration file located in the root directory of the current web application. This <customErrors> tag should then have its "mode" attribute set to "Off".
<!-- Web.Config Configuration File -->
<configuration>
<system.web>
<customErrors mode="Off"/>
</system.web>
</configuration>
Notes: The current error page you are seeing can be replaced by a custom error page by modifying the "defaultRedirect" attribute of the application's <customErrors> configuration tag to point to a custom error page URL.
<!-- Web.Config Configuration File -->
<configuration>
<system.web>
<customErrors mode="RemoteOnly" defaultRedirect="mycustompage.htm"/>
</system.web>
</configuration>
7. You need to create an application in IIS 6 with the same name as the virtual directory. From IIS Manager, expand LOCALSERVER(local computer) -> Web Sites -> Default Web Site -> Sample1.
Right-click Sample1 and select Properties.In the dialog box, select the Directory tab. Click on the Create button and click OK.
8. You should find that the WS app is working normally on the local machine.
9. On a remote machine, it looks like the WS is working.

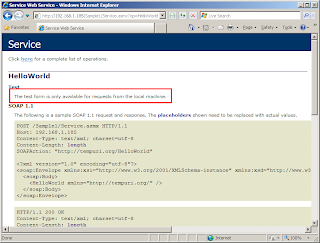
But you will see the following error message when you select the HelloWorld WS:
The test form is only available for requests from the local machine.
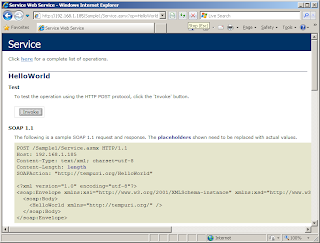
10. Since .NET Framework 1.1, HTTP GET and HTTP POST are both disabled by default. You need to enable them in the Web.config file. From VS, insert the following code into Web.config and re-publish the Web Site as shown in step 3:
Note that the code must be inserted inside the <system.web> tags like so:
<configuration>
<system.web>
<webServices>
<protocols>
<add name="HttpGet"/>
<add name="HttpPost"/>
</protocols>
</webServices>
</system.web>
</configuration>
<webServices>
<protocols>
<add name="HttpGet"/>
<add name="HttpPost"/>
</protocols>
</webServices>
<protocols>
<add name="HttpGet"/>
<add name="HttpPost"/>
</protocols>
</webServices>
Note that the code must be inserted inside the <system.web> tags like so:
<configuration>
<system.web>
<webServices>
<protocols>
<add name="HttpGet"/>
<add name="HttpPost"/>
</protocols>
</webServices>
</system.web>
</configuration>
11. You should find that the WS app is working normally on the remote machine now.
12. If you're going to release this WS app into the production environment, you probably should disable Debugging for your app. From VS, find the following line in Web.config:
Set debug to false and re-publish the Web Site as shown in step 3:
<compilation debug="false"/>
--- The End ---
12. If you're going to release this WS app into the production environment, you probably should disable Debugging for your app. From VS, find the following line in Web.config:
<compilation debug="true"/>
Set debug to false and re-publish the Web Site as shown in step 3:
<compilation debug="false"/>
--- The End ---
Monday, June 22, 2009
Guide to Cracking EnableDebugger2 Password in SWF/Flash
Caveat Emptor!!! Let me first state that I am not an ActionScript programmer. The reason I wrote this article was because I needed to crack an EnableDebugger2 password in a Flash file, but could not find any DIY guide to do it. From the references I found from Google, the details of the hashing scheme used were very sketchy and threw me off the correct trail for hours. This article represents hours of research, experimentation and source code review, and I’ve provided all the technical details that I feel is important for my peers reading this article.
The article presumes an intermediate level of technical competency.
You can access the PDF version from here.
The article presumes an intermediate level of technical competency.
You can access the PDF version from here.
Wednesday, June 10, 2009
Windows Update IE Frame Recursion/Loop Problem when Selecting "Optional" Updates
I've been having problems performing the "Windows Update" with the Internet Explorer on one of my Windows Server 2003 system, which is used as a software testing workstation.
From IE6 to IE8, the whole "Windows Update" process goes on normally until I try to select the "Software, Optional" option on the side frame. IE just loads another "Windows Update" process in the center frame.
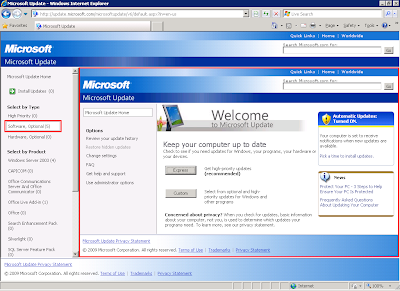
Prior to IE8, the recursive process just cascades deeper and deeper, with more frames within frame. But since IE8, the process is now a loop. When I try to continue the "Windows Update" process in the sub-frame window, the sub-frame just goes back to the original "High Priority" option sub-frame.
The funny thing is that it only happens to one of my machines. Usually, I just use CTupdate to update this machine and forget about it; but I thought I'll fix it since I have some free time now.
After a little googling, I found a link to this page:
http://www.microsoft.com/communities/newsgroups/en-us/default.aspx?dg=microsoft.public.windowsupdate&mid=bcd4ec08-55d3-4ee5-8daa-56dcd25f5311
The forum poster found out that it was the "BitComet Helper" add-on from his BitComet 0.84 that was affecting his Windows XP system.
I checked and I found that I have an old BitComet 0.7 in my system that I have totally forgotten about, so I went on to disable the add-on.
In IE8, I went to "Tools -> Manage Add-ons", and disabled the "BitComet Helper" add-on.

Problem solved and my "Windows Update" is now working fine.
From IE6 to IE8, the whole "Windows Update" process goes on normally until I try to select the "Software, Optional" option on the side frame. IE just loads another "Windows Update" process in the center frame.

Prior to IE8, the recursive process just cascades deeper and deeper, with more frames within frame. But since IE8, the process is now a loop. When I try to continue the "Windows Update" process in the sub-frame window, the sub-frame just goes back to the original "High Priority" option sub-frame.
The funny thing is that it only happens to one of my machines. Usually, I just use CTupdate to update this machine and forget about it; but I thought I'll fix it since I have some free time now.
After a little googling, I found a link to this page:
http://www.microsoft.com/communities/newsgroups/en-us/default.aspx?dg=microsoft.public.windowsupdate&mid=bcd4ec08-55d3-4ee5-8daa-56dcd25f5311
The forum poster found out that it was the "BitComet Helper" add-on from his BitComet 0.84 that was affecting his Windows XP system.
I checked and I found that I have an old BitComet 0.7 in my system that I have totally forgotten about, so I went on to disable the add-on.
In IE8, I went to "Tools -> Manage Add-ons", and disabled the "BitComet Helper" add-on.

Problem solved and my "Windows Update" is now working fine.
Tuesday, June 9, 2009
Bluetooth Audio Streaming from Windows Server 2003 to LG FB163
I've recent got a sexy little LG FB-163 Micro HIFI System that comes with Bluetooth. Unfortunately, the Bluetooth is only used to stream audio, and not for file transfer or sharing as I had originally hoped for.
After a lot of procrastination, I finally got around to try out the Bluetooth function. After a lot of experimentation, I got it working with the following configuration:
OS: Windows Server 2003
BT Stack: BlueSoleil version 6.2.227.11 (Demo)
BT Dongle: D-Link DBT-120 rev B4
At first, I was using a hacked Windows XP Bluetooth stack with a D-Link DBT-120 rev B4 dongle as Windows 2003 do not come with a Bluetooth stack, but I couldn't get my PC to pair with the FB-163.
As the FB-163 uses the newer A2DP Bluetooth profile, I went out and bought a newer dongle (unbranded model ES-389), thinking that it is a hardware problem. The ES-389 was detected as a "Silicon Wave" bluetooth device by Windows, but couldn't pair with the FB-163 either.
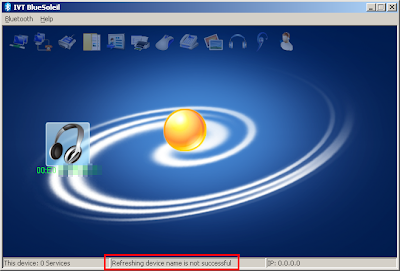
So I thought, maybe I need a newer Bluetooth stack. Thus I installed BlueSoleil version 6.2.227.11 as I had downloaded the demo version previously. Unfortunately, when I tried to pair ES-389 with the FB-163, it couldn't even get FB-163's device name. The error message was "Refreshing device name is not successful".
After a lot of troubleshooting, I replaced the ES-389 with my older DBT-120 as I remembered that the D-Link dongle could at least get the device name from FB-163.
The short version is that it worked, and here are the steps I took:
After a lot of procrastination, I finally got around to try out the Bluetooth function. After a lot of experimentation, I got it working with the following configuration:
OS: Windows Server 2003
BT Stack: BlueSoleil version 6.2.227.11 (Demo)
BT Dongle: D-Link DBT-120 rev B4
At first, I was using a hacked Windows XP Bluetooth stack with a D-Link DBT-120 rev B4 dongle as Windows 2003 do not come with a Bluetooth stack, but I couldn't get my PC to pair with the FB-163.
As the FB-163 uses the newer A2DP Bluetooth profile, I went out and bought a newer dongle (unbranded model ES-389), thinking that it is a hardware problem. The ES-389 was detected as a "Silicon Wave" bluetooth device by Windows, but couldn't pair with the FB-163 either.
So I thought, maybe I need a newer Bluetooth stack. Thus I installed BlueSoleil version 6.2.227.11 as I had downloaded the demo version previously. Unfortunately, when I tried to pair ES-389 with the FB-163, it couldn't even get FB-163's device name. The error message was "Refreshing device name is not successful".

After a lot of troubleshooting, I replaced the ES-389 with my older DBT-120 as I remembered that the D-Link dongle could at least get the device name from FB-163.
The short version is that it worked, and here are the steps I took:
- In the start screen, the FB-163 is identified by a "Headset" icon with its MAC address.
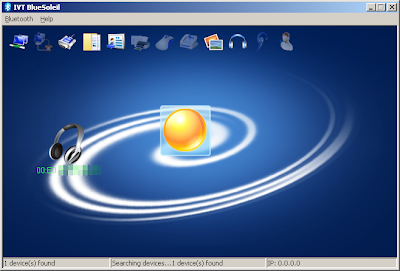
- When I right-clicked the "Headset" icon and chose "Get Device Name", it worked and got the "LG_AUDIO" device name.
- I right-clicked the Headset icon and chose "Pair". The passkey dialog box appeared and I entered the default PIN "0000" (Why do everyone seem to use the same PIN?).

- The DBT-120 and FB-163 are now paired.

- Finally, I right-clicked the Headset icon and chose "Connect Bluetooth Advance Audio". The DBT-120 and FB-163 are now connected.
Sunday, March 22, 2009
Installing Windows Live Messenger 2009 on Windows Server 2003
When I tried to install the new Windows Live Messenger 2009 on my Windows Server 2003 machine, I got the "Couldn't install programs" error message, and the detail is "os_check: 0x8028004".
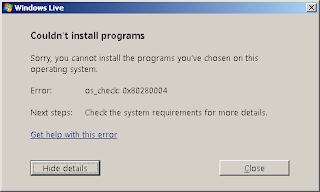
Apparently, Windows 2003/2008 and 64bit XP systems are not supported by the new Live Messenger.
Thank goodness I came across the following site:
http://www.gtalkme.com/development/install-windows-live-wave3-on-windows2003-or-2008.html
It's about "Windows Live Wave 3" and it's in Chinese, but the hack is identical.
.

Apparently, Windows 2003/2008 and 64bit XP systems are not supported by the new Live Messenger.
Thank goodness I came across the following site:
http://www.gtalkme.com/development/install-windows-live-wave3-on-windows2003-or-2008.html
It's about "Windows Live Wave 3" and it's in Chinese, but the hack is identical.
- Download the messenger wlsetup-custom.exe.
- Open it with Resource Hacker.
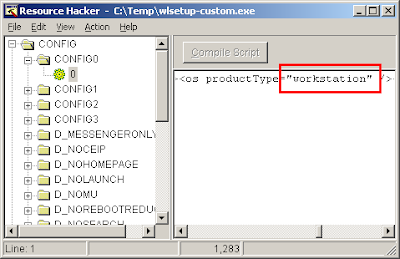
- Open the resource tree to "CONFIG -> CONFIG0 -> 0".
- Find the XML tag: <os productType="workstation" />
- Change "workstation" to "server" and recompile the script in the Resource Hacker.
- Remember to save the modified installer file.
Subscribe to:
Comments (Atom)
